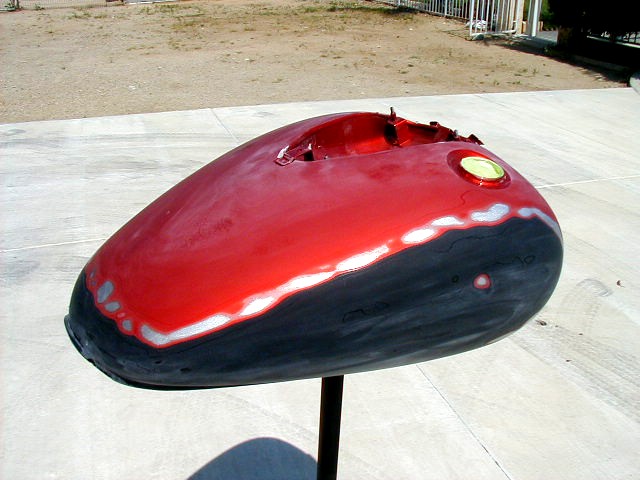
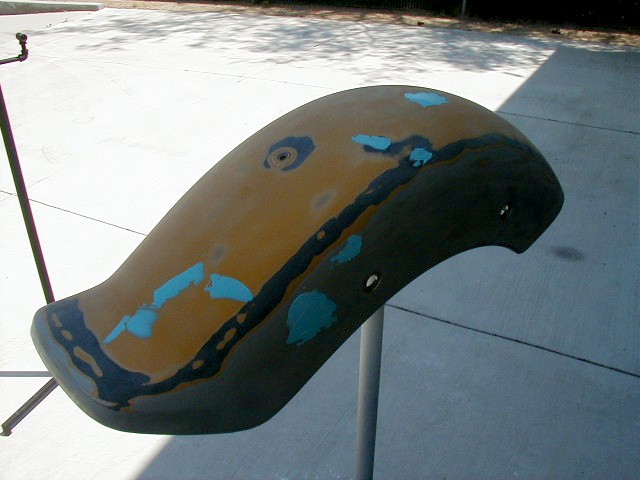
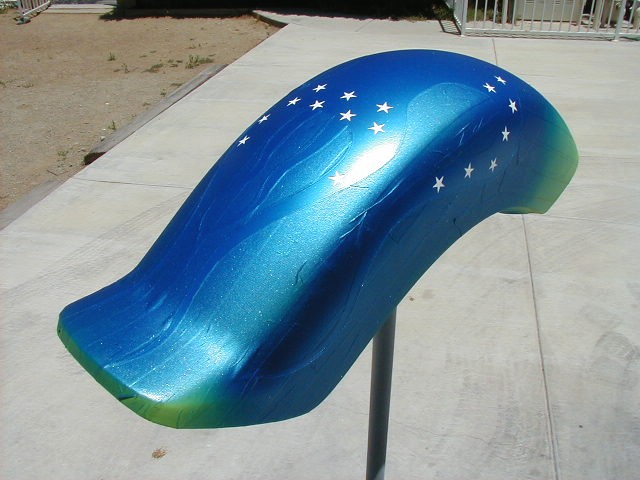
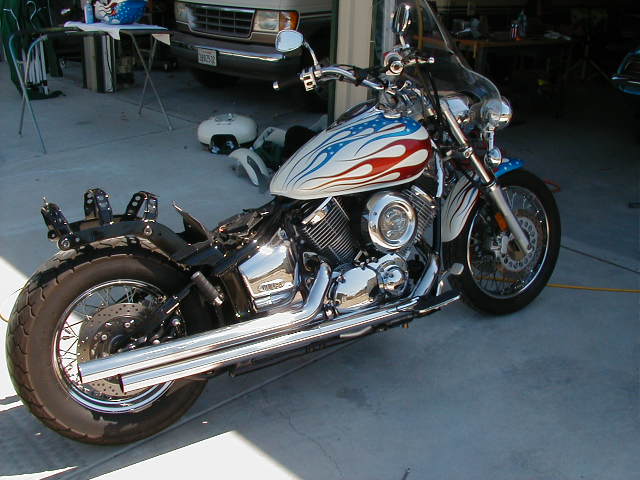
Check out the pinstriping disaster that totally ruined my new paint job! I had to completely sand off the new paint job and redo the entire job. I was so pissed! Check below for pics.
I am going to walk you through, step by step, the process of automotive painting. I have only been painting for about a year and have limited experience, but as you will see, you too can learn to paint your car or motorcycle in a short amount of time and do a high quality job. Warning: Follow all directions on all products and use proper respiratory and eye protection when sanding and painting. I will cover the tools needed, spray guns, body work, prep, sanding techinques, primers, sealers, basecoats, pearls, Kandys, and clearcoats. I will also cover a little on color sanding and polishing at the end. Just keep in mind that color sanding and polishing are an art form and science in their own right and take as much practice and experience as body and paint work. The same can be said for clear coating.One thing I was taught was you have to earn the right to be a painter by learning the body work and prep work phase. You need an appreciation of the preparation it takes before you can lay down color. A paint job is only as good or great as the body and prep work. So, you must learn the prep before you can paint.Rembember, I Am Not An Expert With Years Of Painting Experience. I Am Simply Offering The Knowledge I Have Learned So You Can See That You Can Learn To Paint Too. It's not that tough, it just takes patience to do all the steps properly for a great paint job.You will need to invest in tools to do this type of work. The first is to have a compressor that is capable of at least 14cfm. I bought a good 60 gallon compressor from Harbor Freight for about $450.00. It works great and it was delivered to my door step.
To start your prep, you will need all of the tools and supplies in the picture above consisting of quality body filler and glazing compound with hardener, air grinders, sanding blocks, grater, sand paper, tack cloth, wax and grease remover. Use the paper towels I have shown. These have the least amount of lint and can be purchased at Home Depot. You will also need a couple of types of body hammers and dollies (not shown) to straighten any dented or damaged metal. |
|
|
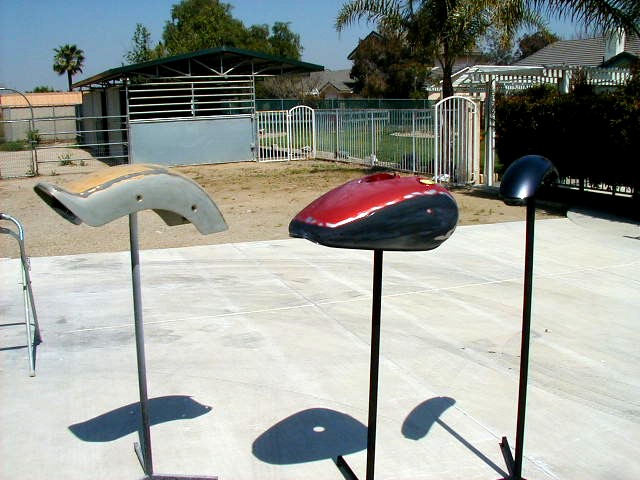
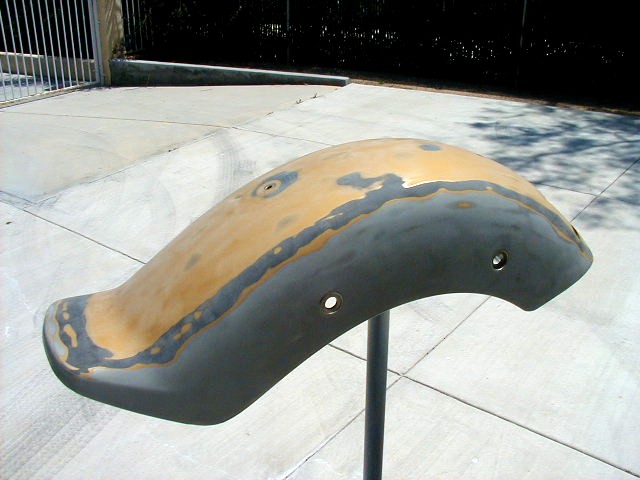
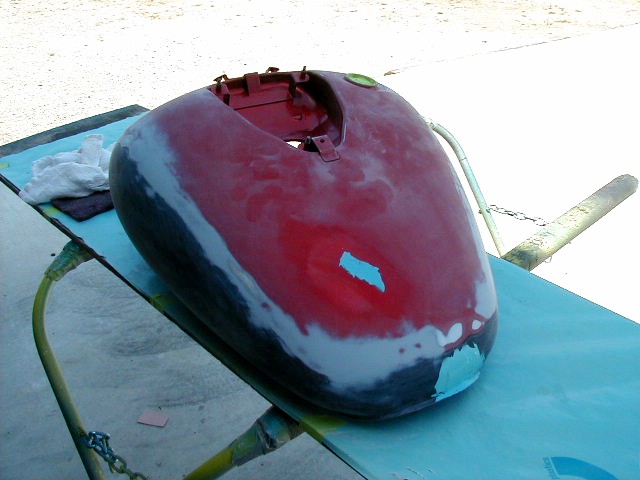
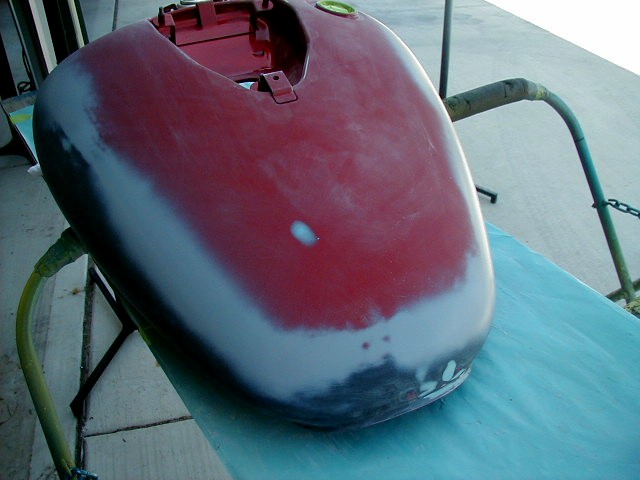
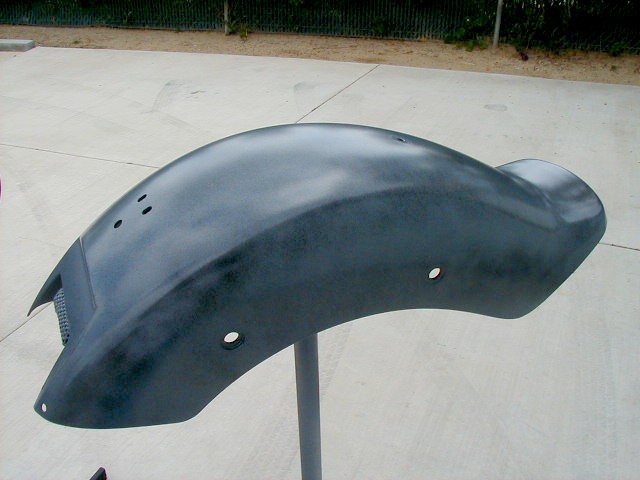
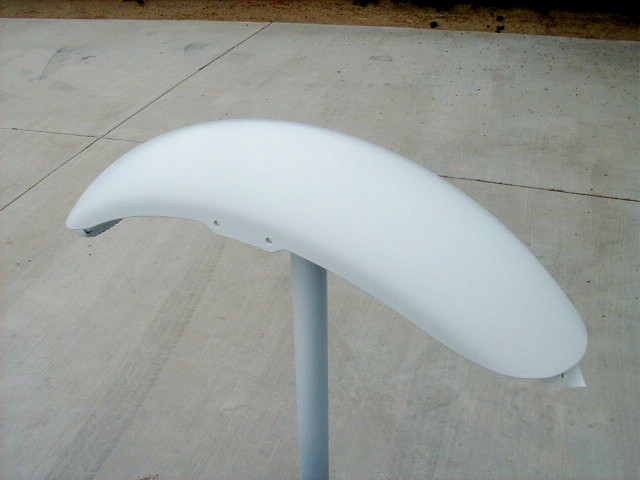
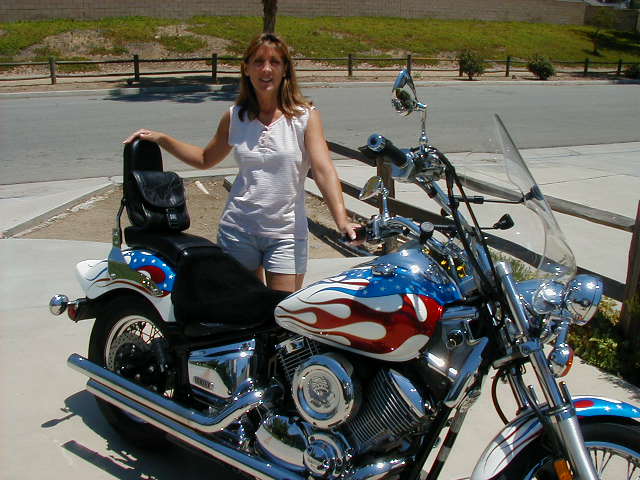
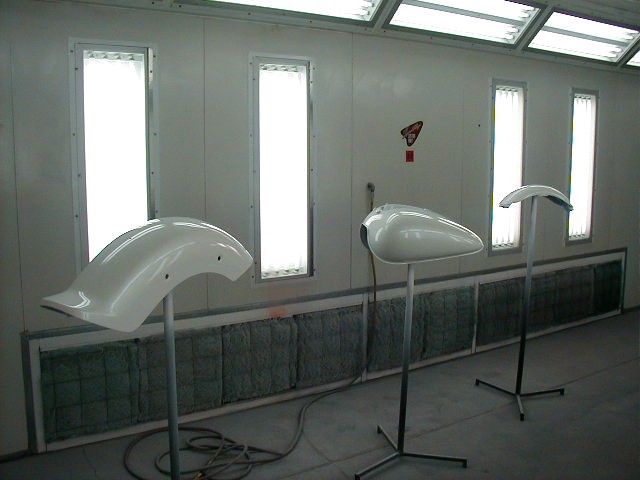
This tank and fender set, when finished, will be for my wife's, 2003 Yamaha V Star 1100 Custom. I purchased these separately, on Ebay, so I can do the paint work without having the bike down while the paint is being done. The fender and tank stands can be purchased from Eastwood, but are over $500.00. I made these three stands for under $50.00 in metal.I began by removing the pinstripes and any stickers on the rear fender and gas tank. I used an air powered random orbital sander with 80 grit paper. The pinstripes were under the clear coat so it made it difficult not to cut down to bare metal. Once stripes were gone, I switched to 180 grit on the sander and sanded the entire tank and fender, feathering the paint where the pinstripes were. I then cleaned the tank and degreased the bare areas and sprayed several light coats of SEM etching primer to the bare areas. This will prevent rust from forming until I can go back and prime the rest of the tank with Epoxy Primer Surfacer. I didn't need to etch prime the fenders becuase they are fiberglass, thus no rust. One thing to remember is if you are painting over factory paint, as I am, you don't need to strip the paint to bare metal. If you are painting over and unkown paint job, then you must strip to bare metal to prevent any of the old paint job from bleeding through later and ruining your new paint.
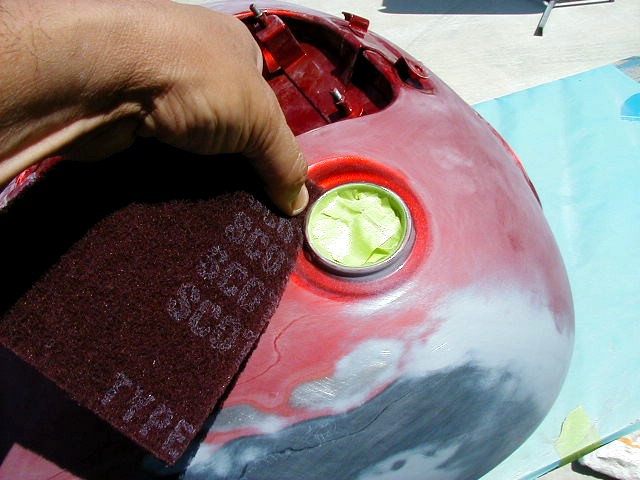
It is very difficult to get into tight spaces with sandpaper, so I use the red Scotchbrite pad for those tight areas. Dry it is equal to about 220 grit or so. Wet it doesn't scuff as much, about 400 grit. The water helps lubricate causing smaller sand marks. The gray pad is equal to about 600 grit. There isn't much bodywork to do on these pieces, but there are a couple of scratches and small chips that need filling. I can do that with the glazing compound. If you need to fill an area deeper than 1/8 inch, you will need to straighten the area as smooth as you can with the hammer and dolly, grind the area to bare metal, use the body filler , sand with 80 grit, then with 150. Then you have to use the glazing compound over the filler because small pinholes get into the filler when being mixed and the glaze will fill those plus any other imperfections in the body filler. The idea is to hammer and dolly the metal as flat and smooth as possible, and grind a little for smoothness so you only have to use a skim coat of filler on the repair. Also, you only use a skim coat of glaze as well. This will keep you from having to sand and sand for days to knock it down. Now that I have the glaze applied, I'll let it dry for about 15 minutes and sand it with 150 grit until smooth. When blocking, use a criss cross pattern to get the area you are sanding as flat as possible. Do it on radiused areas as well to get a nice uniform contour. Use your hand and rub the entire surface area to feel for low spots. If you can feel them, fill with glaze. If there are high spots, knock the high spot down with your body hammer, or light grind with the die grinder. If the area is flat but there are pinholes, a second coat of glaze is needed, then repeat the sanding process constantly feeling with your hand to make sure the surface is flat. Then the whole tank and both fenders get a final blocking with 220 grit. Now that the tank and fenders are perfect, no high or low sposts, we're ready to spray 4 coats of Epoxy Primer Surfacer. We're getting close to paint.
Always do the body work before priming, unless you have to seal bare metal for rust prevention. Then grind away the sealer to do your bodywork. If you prime over heavy scratches or chips without fixing them, the primer can later shrink causing your beautiful paint job to be ruined. There are two ways to prime for paint and/or sealing bare metal. The older way is to spray the metal with etching primer which has acid in it that helps it adhere to the metal, but only provides OK rust protection. Etching primer needs to be block sanded with 180 grit or 220 grit once dry. Then you have to do the final priming with a 2K Urethane primer. 2K or two component means the primer has a hardener added to it. Never use a 1K primer. The new way, and the way I prefer is to use Epoxy Primer Surfacer to both seal bare metal, and use for final primer. Epoxy encapsulates the metal and provides outstanding rust protection. Moisture has a very tough time penetrating Epoxy, that's why it's great in rust prevention. It is also a 2K primer but is much less toxic than Urethane primer. Epoxy primer surfacer is high build so 3 or 4 good coats will give you plenty of build to do your final block sanding.So, the steps are remove old paint by chemcal, blasting, or grinder unless painting over factory paint, seal the metal with epoxy primer, do your bodywork and block with 80, then 150 or 180 until all surfaces have no high or low spots. Next apply 3 to 4 coats of epoxy primer surfacer, apply a guide coat and let dry overnight. You can now block with 400 grit wet until the guide coat is gone. Now apply one last light guide coat and block sand with 600 wet if applying solid color base coat, or 800 wet if applying metallic basecoat. Touch up sanded through areas with more Epoxy primer, or use a sealer prior to spraying the base coat. Sealer is not needed if you don't sand through any of the Epoxy primer. Sealer is a non sanding primer you spray on 30 minutes before spraying the first coat of color. It gives the color a uniform base so less coats of color are needed.
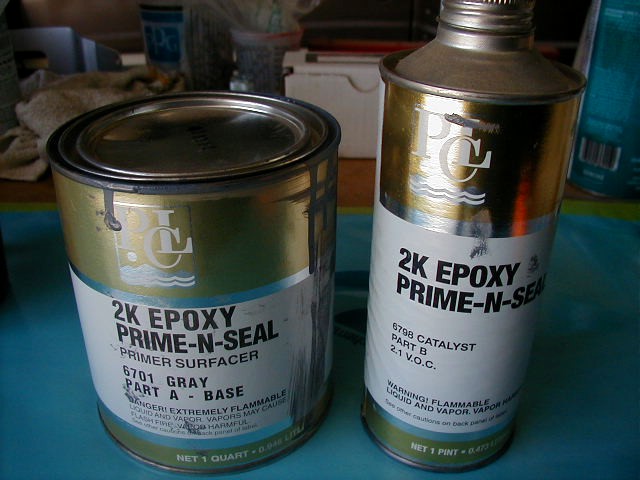
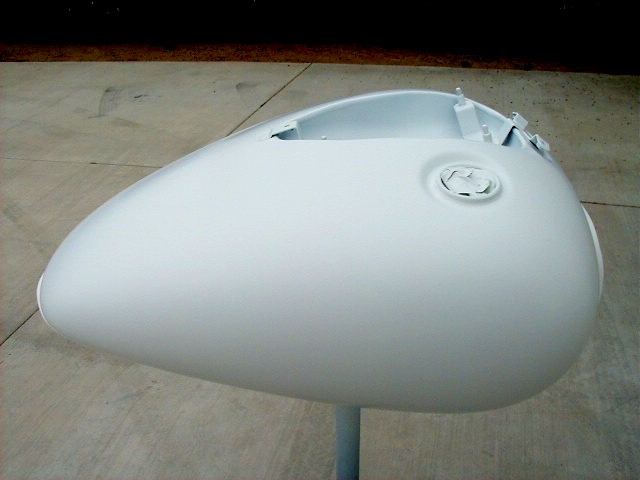
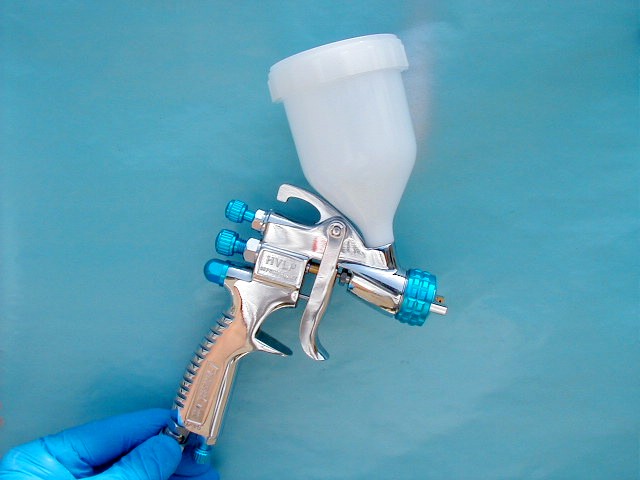
I like using PCL Epoxy Prime N Seal because it not only will seal bare metal, but is a great high build primer surfacer, and sealer when you add one part reducer (thinner). Also, it is about two thirds the cost of PPG or Dupont. As you can see below, there is almost no orange peel which will allow me to start wet sanding with 400 first. I'm using a Titan HVLP gun with a 1.4mm tip. This is an inexpensive gun, but for primer it gives great results. The smaller tip also helps with orange peel. I adjusted the material knob out 4 turns with about 15 psi at the gun with full fan. Do a spray pattern check, like above, and make sure you have a nice cigar shaped pattern or you will have uneven application. Adjust the air pressure to give you the best pattern and overlap each pass by 50%. This will give you good coverage. Only put one coat on at a time or it will mess up your flash time and you most likey have runs.
This primer is mixed using 2 parts primer to 1 part hardener. If used as a sealer just add 1 part reducer to thin it similar to a basecoat. I applied 3 wet coats, with a 15 minute flash time between coats. Flash time refers to the time it takes for the solvents or reducers in the paint to evaporate. Letting the paint flash within the alotted time is crucial to ensure proper adhesion of all primers, basecoasts, and clears. When purchasing paint, primers, or clears, ask for the tech sheet for the paint you are buying. It gives crucial information on mixing, spraying, and flash times. I really like this stuff, it goes on like glass which greatly reduces the amount of final sanding.
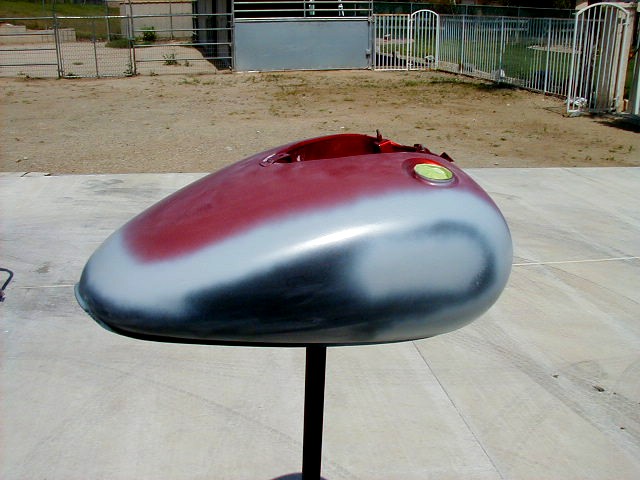
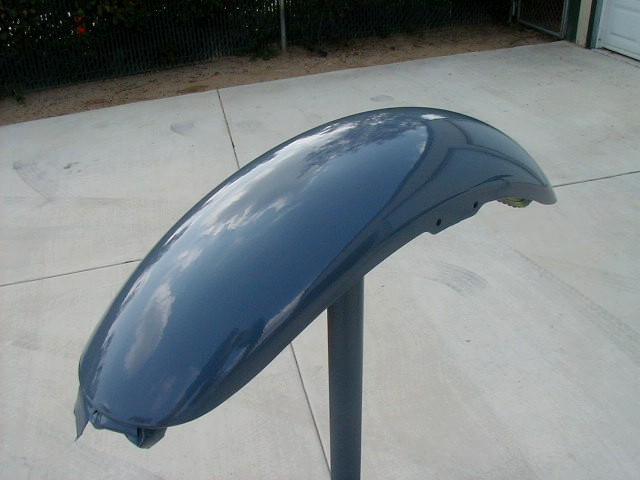
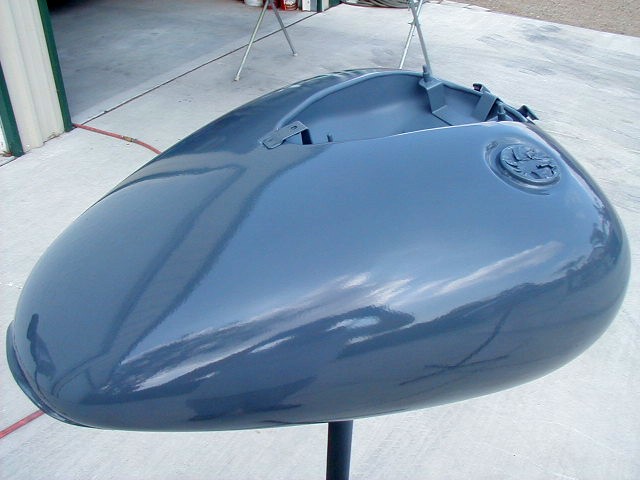
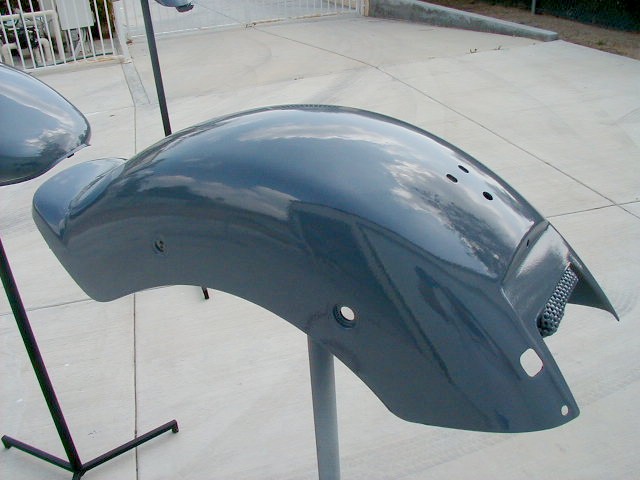
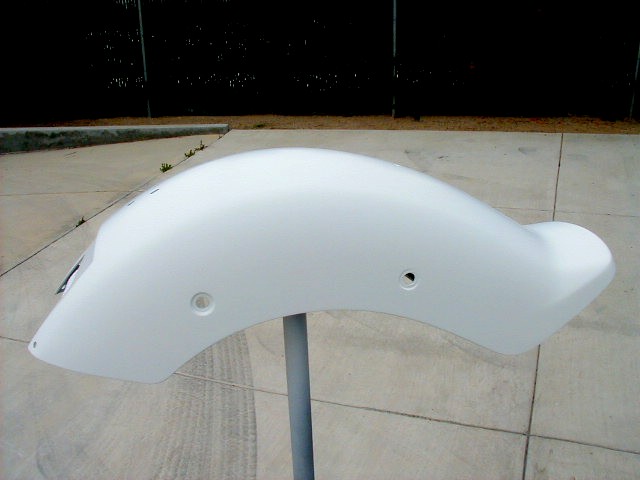
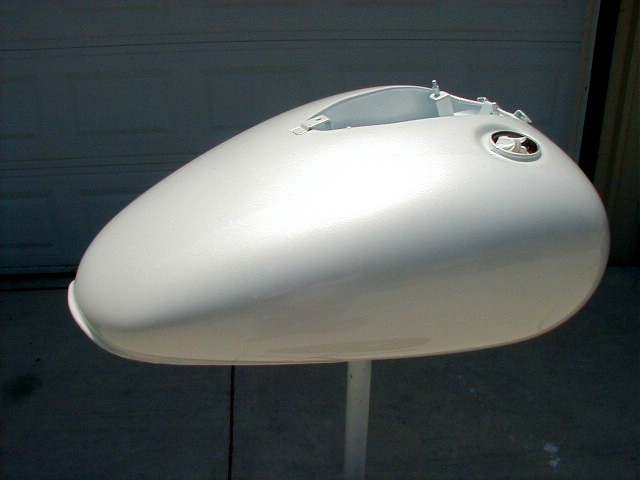
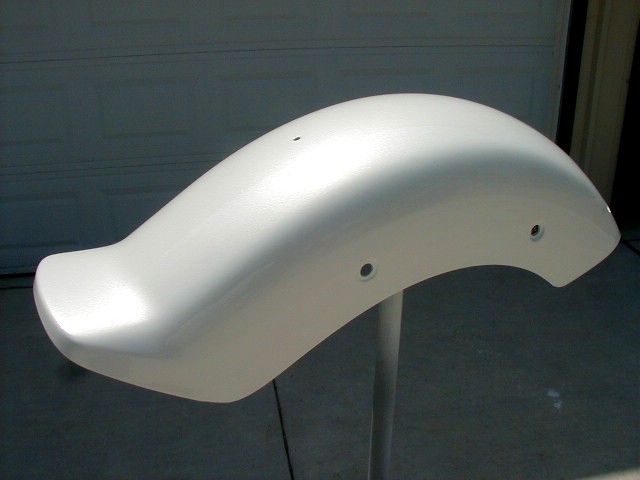
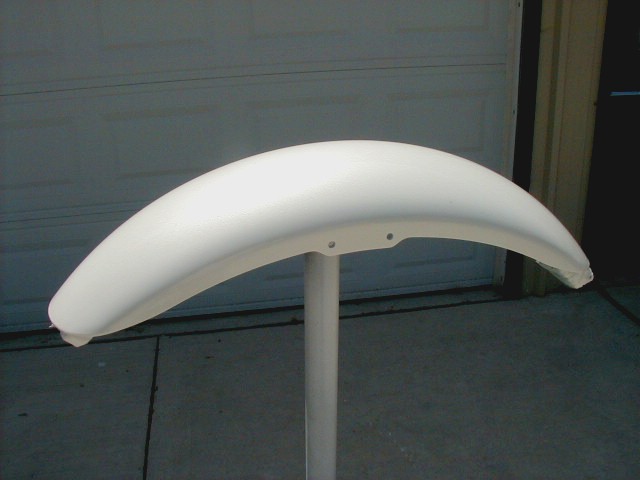
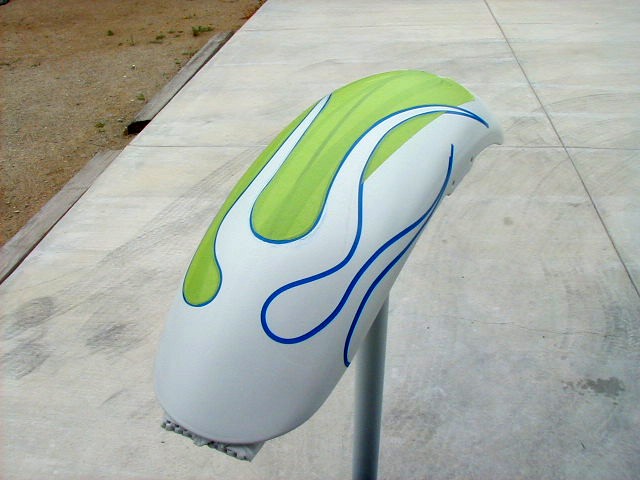
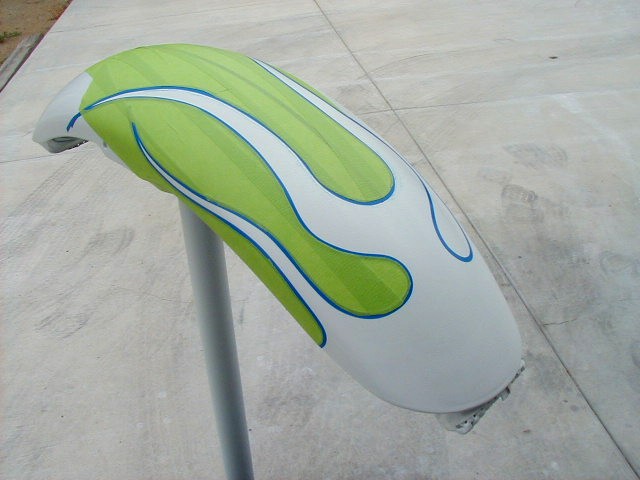
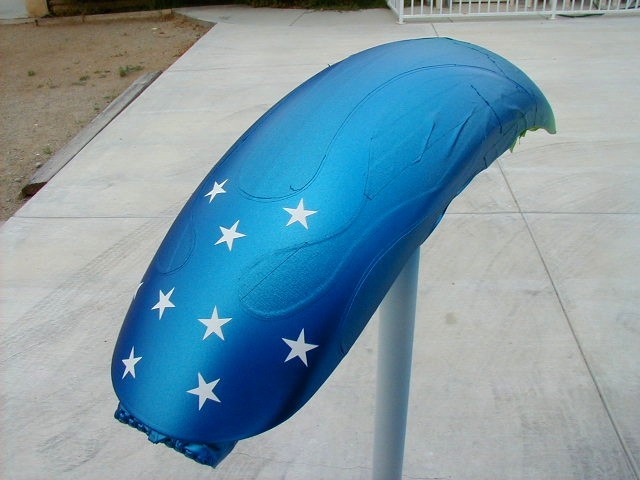
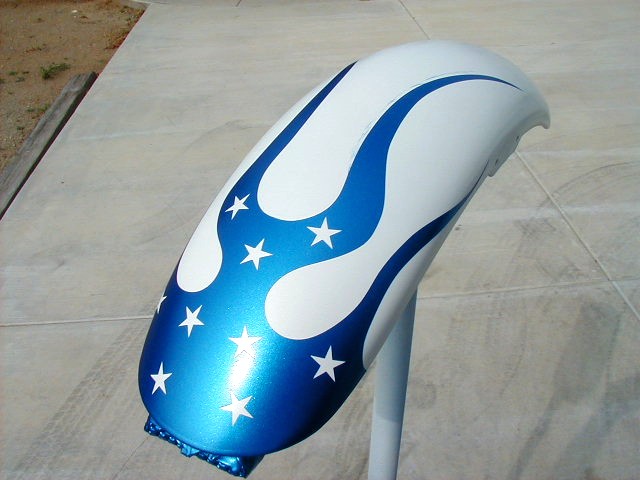
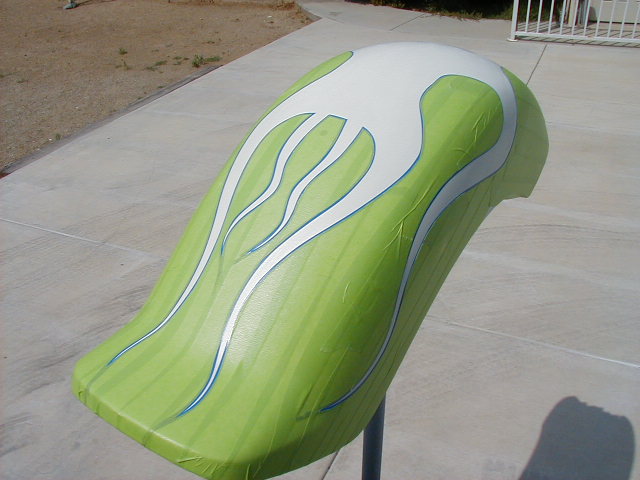
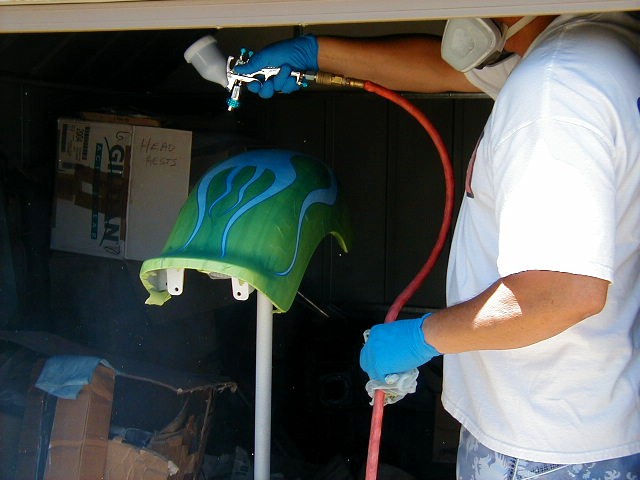
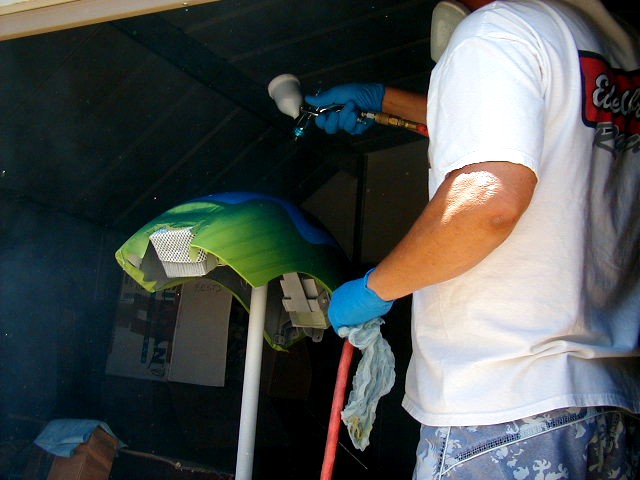
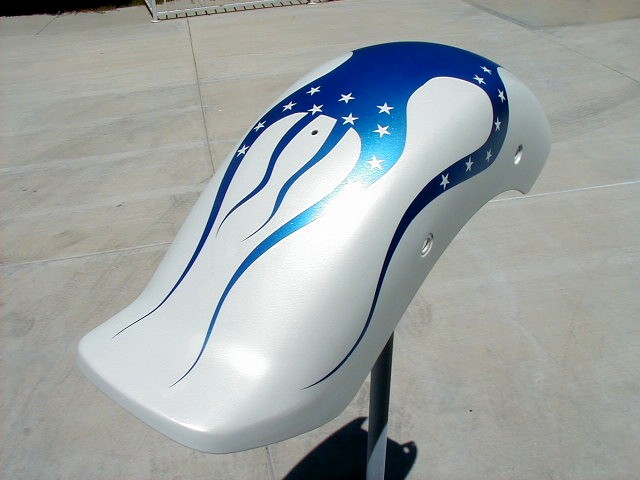
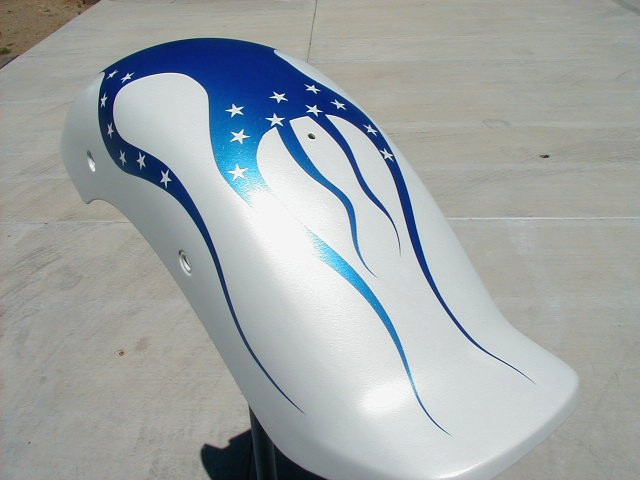
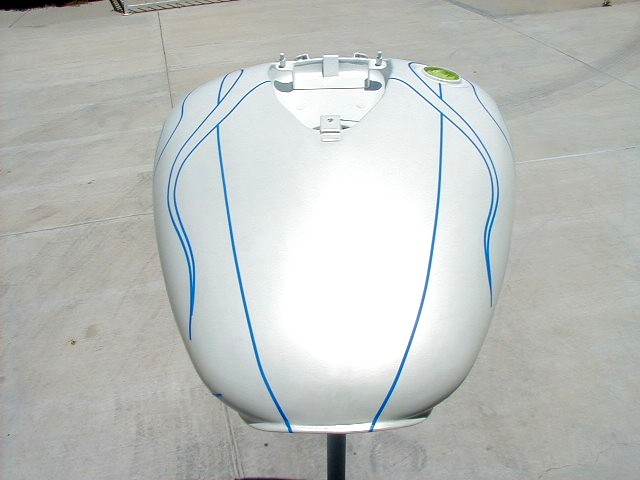
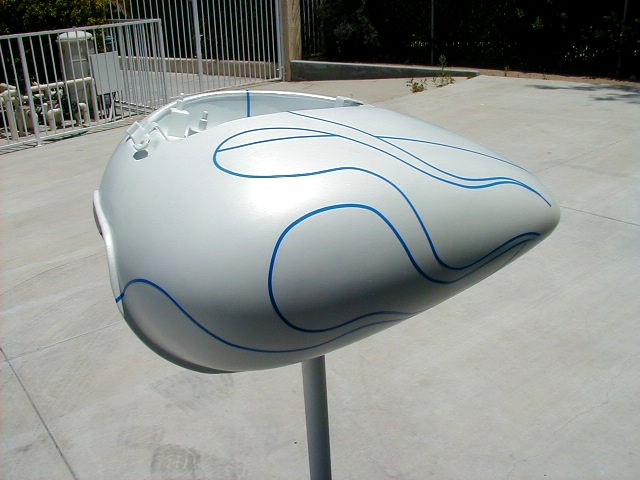
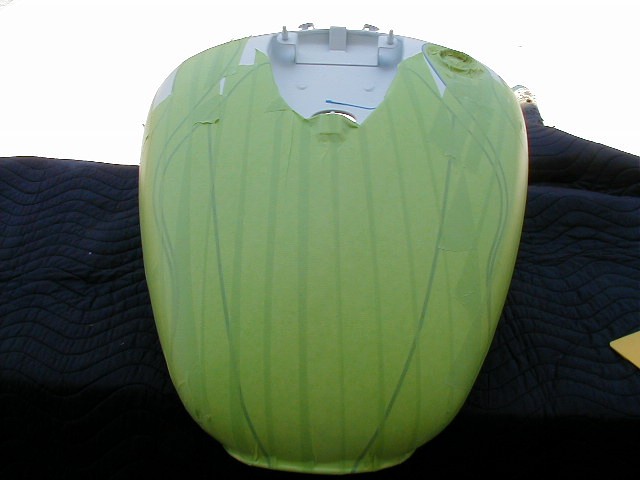
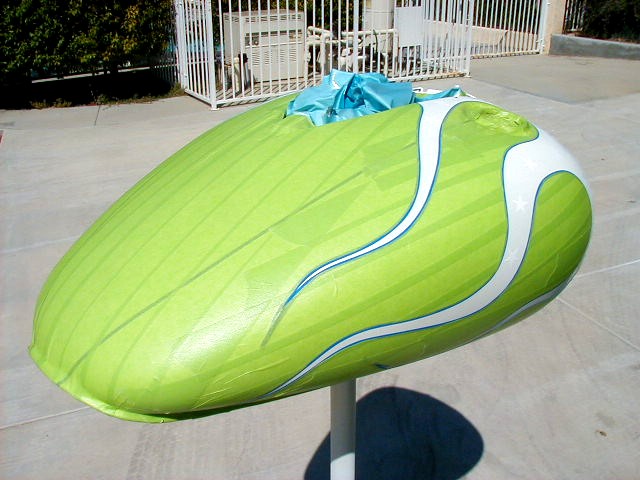
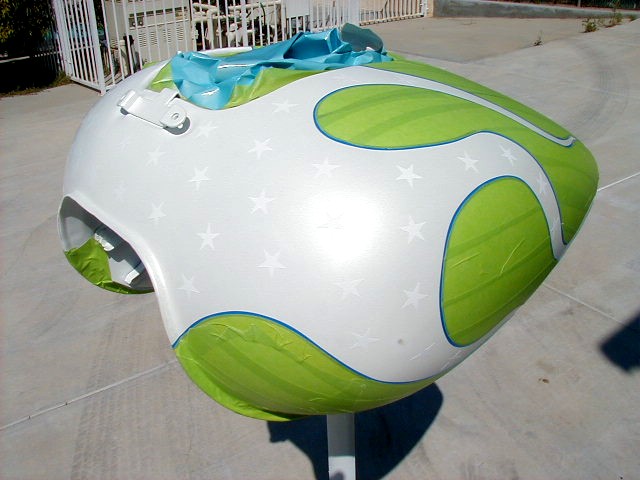
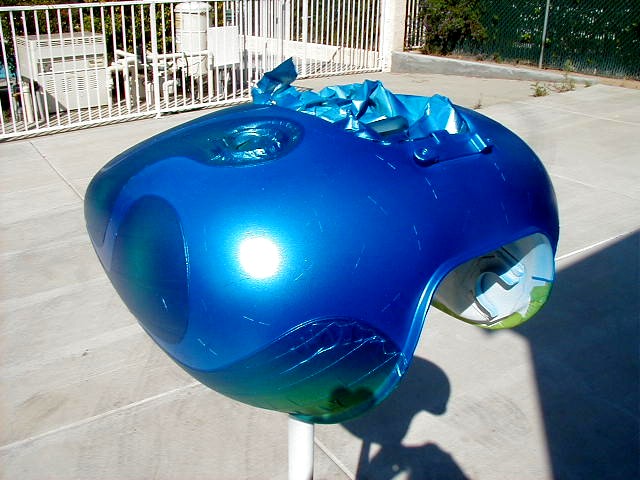
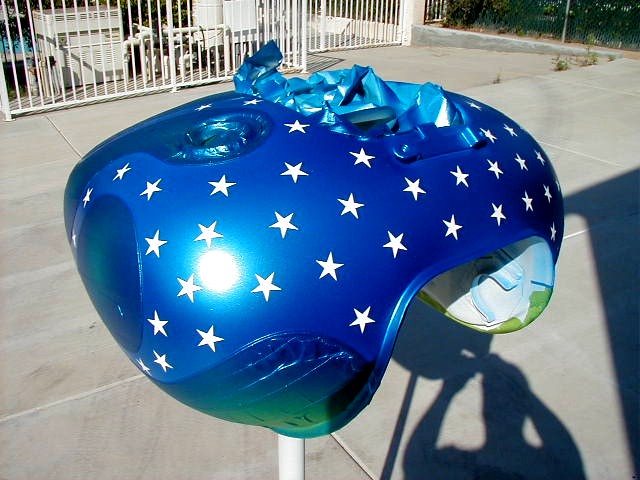
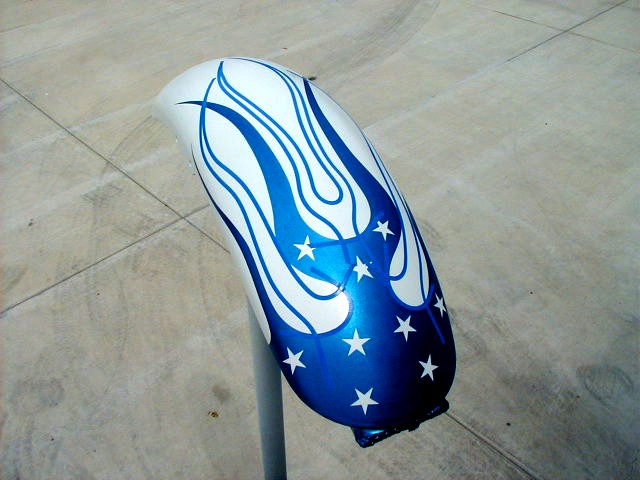
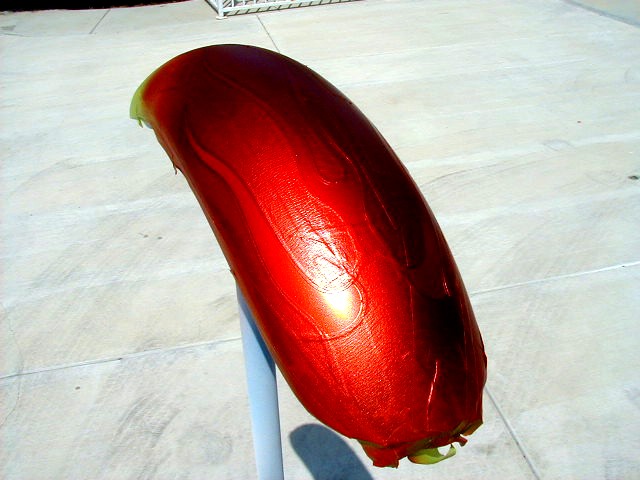
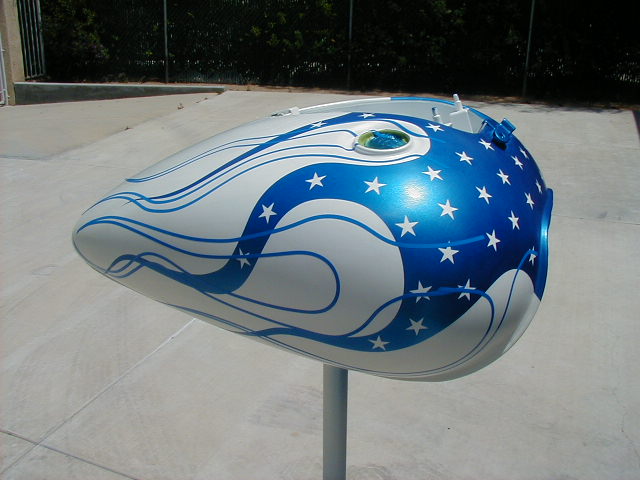
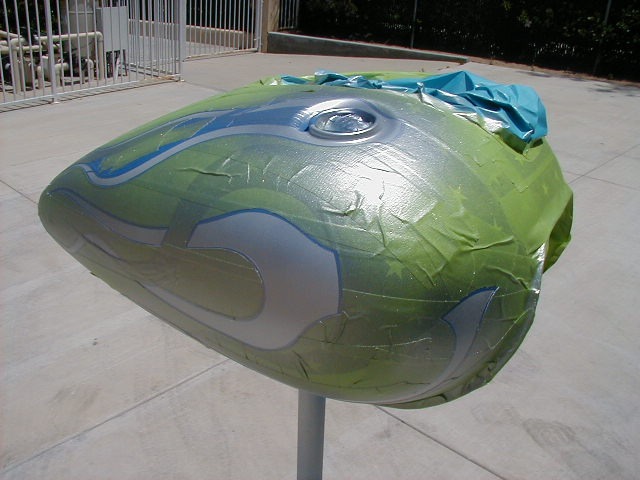
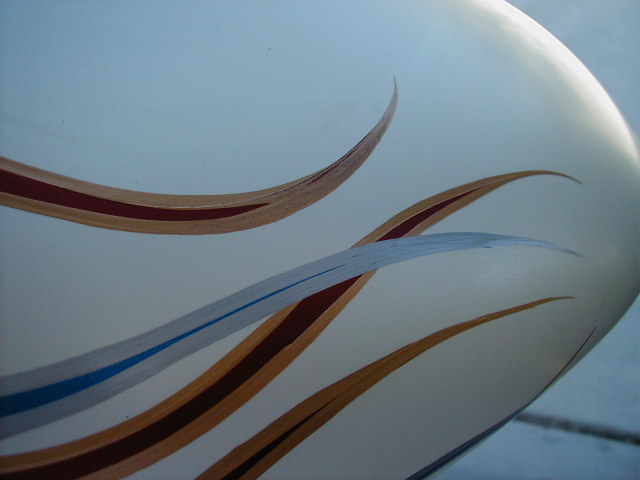
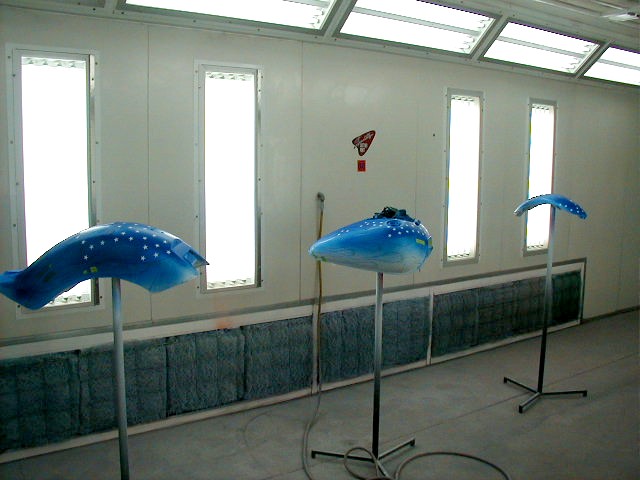
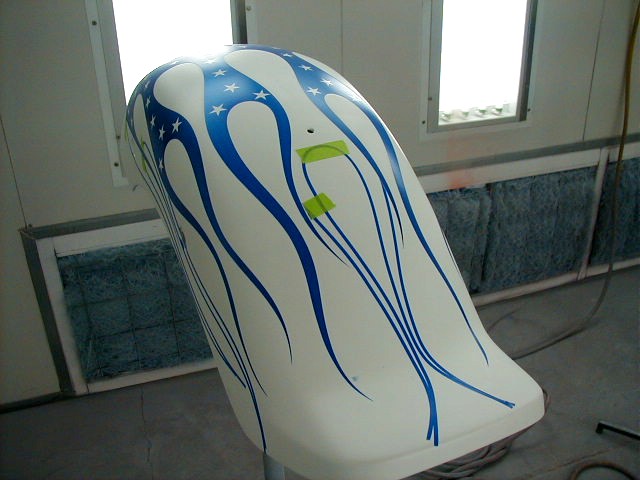
Now that the primer was wet sanded with 400 wet, then 800 wet, I degreased everthing, tacked off the surfaces and sprayed about 5 coats of Dupont White Base Coat. I mixed it 50 50 with medium temp BaseMaker reducer in a cup, mixed it well, and strained it into my Transtar HVLP 1.3mm gun. This is a good all around gun that costs less than $100.00 and it lays down paint very nicely. The basecoat has no hardener added to it, that is why it needs to be covered with a catalyzed urethane clear coat. More on that later. I needed to spray 5 medium wet coats of white to get good coverage. I have learned that this is the norm for light colors and transparent metallics such as silver. I let each coat flash for about 10 minutes before applying the next coat. I am actually doing a 3 stage paint job because after the white flashed for about 20 minutes, I applied 3 coats of Dupont neutral pearl with a 10 minute flash time between coats. If I wasn't going to do artwork, I could now spary the urethane clear to seal it all up. But, I'm going to lay down some flames in a stars and stripes theme. So, instead of spraying catalyzed urethane clear, I used House Of Kolor SG-100 base coat clear to protect the white and pearl coats. This is a low build clear that protects the paint underneath so you can tape out graphics and artwork but it is not catalyzed so it needs to have a final coat of u-clear for that high gloss and UV protection. The SG-100 dries flat unlike u-clear. Notice how the pearl really pops in the sun. Check back soon to see the flames being laid out and painted. I'll start with HOK Stratto Blue with some star stencils and finish with a coat of SG-100. Now things start to get a little tricky. I am doing a stars and stripes graphics theme for my wife's bike so I had plenty of input from her and what she wants. We looked at a bunch of pics on the web and came up with a basic flame theme and just copied it. Using 1/8 inch 3M Fine Line tape, I ran a piece of tape for my centerline. I then started with the upper flame licks by free-handing the tape until I got the inside lick laid down. Then I did the outside of the lick and came down and did the lower licks on each side. This is the first time I have painted any graphics so it took numerous attempts to get the tape just right to meet my wife's approval. Now that the basic design was laid out, I masked off the areas I didn't want painted and trimmed around the design with a razor blade. Be extremely careful not to cut into the paint below. The damage is irrepairable. Practice on some scrap so you don't ruin your paint job you just spend hours and hours to finish. I did cut through into the white in a few spots, but I'm going to have the flames pinstriped when done so it will cover the damage. I was really disappointed I did that, but fortunately the pinstriping with cover the small cuts I accindentally made with the razor. Next, I went down to my local sign shop and they cut me a sheet of 150 stars 3/4" in size. I degreased the area to be painted, the placed the stars in a random pattern. Then I tacked everything. Then using my Devilbiss touch up gun I got from The Eastwood Company for under $50.00, I sprayed about 4 coats of HOK Stratto Blue with a 10 minute flash between coats. I then removed the star stencils and and sprayed two coats of SG-100 basecoat clear to protect the blue. After that flashed for about 20 minutes, I pulled the tape and cleaned up any bleed through areas with a little acetone. I still have to lay out the tank and rear fender. But this was so time consuming, I can let the SG-100 dry, then scuff it later before the urethane clear is applied. This allows me to do the graphics in stages at my leisure. Next the red flames will be laid out so it looks like they are under the blue. So far, so good! Now for the rear fender. I scuffed the inter coat clear on the rear fender with 800 wet and dried the surface. Be very careful not to sand through the SG-100 into the color below or you will have to stop, repair the white and the pearl, then recoat with SG-100. Starting with a centerline, I begain laying out the design with my 1/8" fine line tape. Once I had the basic idea of what I wanted, I then refined each lick until it was the proper length and width. I took me numerous times of removing the tape and trying again, so don't get discouraged. The tape can be moved with the tip of your finger if you have a slightly uneven spot. Once I was satisfied with the design, I masked the entire fender. This time I used an Exacto Knife to cut out the design. The Exacto lays flatter over the taped surface so there is much less chance of cutting through into the paint below. I'm happy to say it worked and I had no cut marks on the rear fender. Now I'm ready for color. I degreased the area, tacked it off with the tack rag and compressed air, and mixed my Stratto Blue. I sprayed two light tack coats with a 10 minute flash in between, then sprayed 3 more medium wet coats with a 75% overlap. This overlap helps prevent any streaking or mottling of the metallic paint. You'll notice is the pics where I'm spraying, it looks like there is dust all over the place. Actually, that is the metallic from the paint reflecting off the sun. I'm using my small shed as a piant booth and it worked well. Once I had good coverage and the blue had flashed for about 20 minutes, I removed the star stencils, as before, and sprayed on two coats of SG-100 to protect the blue. The SG-100 is sprayed with a 50% overlap. Again, be careful to let all of your coats flash properly. If you apply paint too soon, it will wrinkle, craze, and do all types of wierd stuff. The wrinkling and crazing is due to the sovents on the surface of the paint that have not evaporated, mixing with your new coat. It's kinda like mixing oil and water. They separate causing all sorts of problems. The same problems occur if you apply too much paint on each coat. Trust me, all of this advice is from experience. After about 20 minutes I removed all the tape to see how it came out. I'm very happy with the results so far. Next we'll tackle the tank. Then it's on to the red. The tank was done in the same way as the rest of the pieces. You'll notice I taped out an area on top of the tank. That is where a leather tank bib will go. So, I laid out the flames around the bib so they wouldn't be hidden once installed. All the same procedures were applied as above. You'll also notice I'm going for a 50s style flame. Kinda wide on the licks and long. This will give it an old school look that go with the stars and stripes theme. As above, I laid out one side then duplicated the design on the other. Masked it off, cut it out, degreased, applied the stars, degreased again, tack rag, 4 coats of Stratto Blue, remove the stars, 2 coats of intercoat clear, then unmask it all. Now it's onto the red flames. I'll tape out my design which will run under the blue, then spray 2 coat of silver base, then 3 coats of KBC Kandy Apple Red basecoat over the silver base. I won't spray the red over the white because the results may be pink flames and I don't want that.
|
|
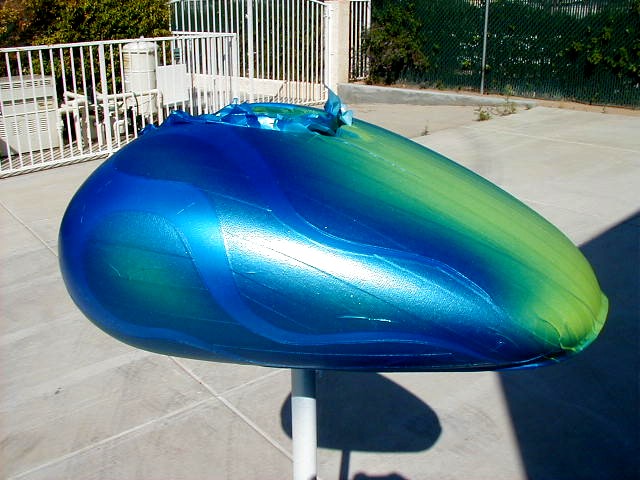
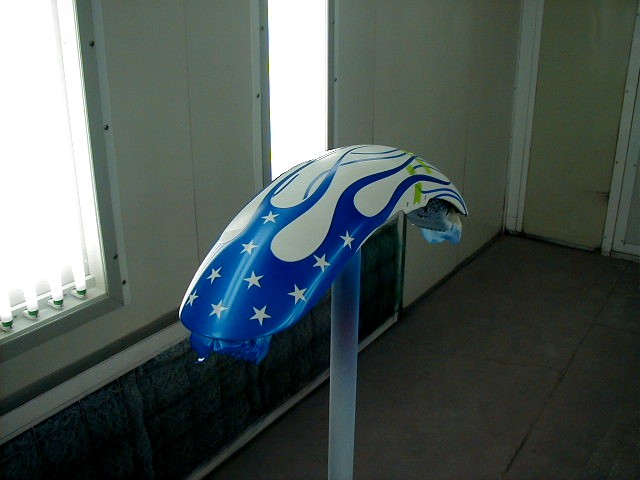
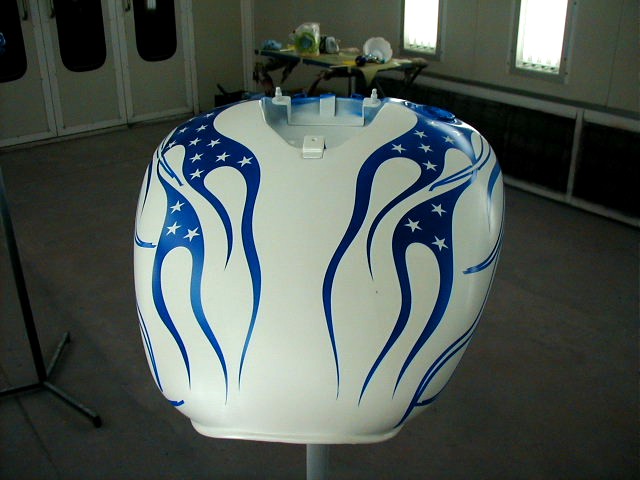
Now I've taped out the red flames, and when done will actually look like they are under the blue. I laid out my design, then I taped over everything I didn't want painted and cut out only the area that will be red. Looking at the tape, it doesn't look like much though this part was very time consuming making sure I had all the correct areas cut out. I then sprayed two coats of HOK Orion Silver for the base under the red with a ten minute flash between coats. I didn't spray the red over the white because there was a chance the red would look pink. Silver is a good base to start with for any Kandy paints. Gold base works well too if you want a gold hue to your Kandy. Silver is neutral so it allows the true color of the Kandy to show. Once the second coat of silver flashed for about 20 minutes, I then sprayed 3 coats of HOK Kandy Apple Red basecoat. This is different than catalyzed Kandy paint in that it only mixes with reducer. There is no hardener needed like with urethane Kandy. So, it is much more forgiving. It dries flat like regular base coat color, and is easy to repair if you make a mistake or dirt gets in your paint.

All of the graphics were painted with my Devilbiss Finishline touch up gun I got from Eastwood. It works great for an inexpensive gun.


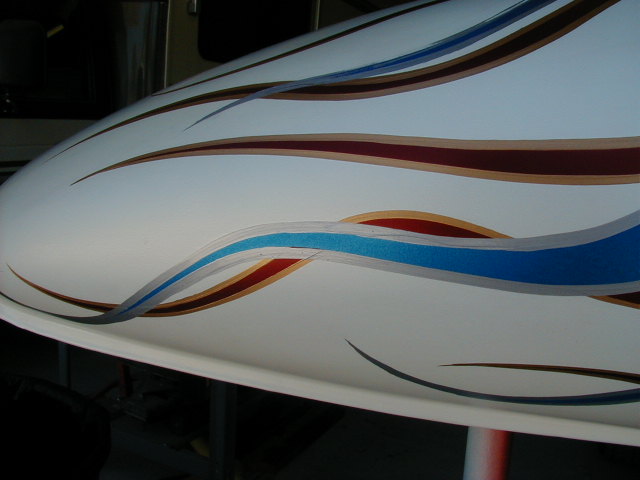
The Kandy is still tricky though. It needs to be sprayed as evenly as possible so there is no blotching or inconsistencies in the color. I sprayed it with a 75% overlap to ensure proper coverage with a 10 minute flash between coats. The more coats you apply the darker the color. 3 coats gave me the right color I was looking for. After the third coat flashed for about 25 minutes, I applied 2 coats of SG-100 intercoat clear with a 10 minute flash time in between. Only one coat of SG-100 is necessary if you are going to do the final clear within 12 hours. I put on two coats because I had to let it set for a day due to work. I'll come back and sand it lightly with 1000 wet before I apply the final clear. It was about 80 degrees today, so I used RU-311 reducer for all the paint used today. Once the clear flashed for about 15 minutes, I removed the tape to reveal the results. Keep in mind I am a novice painter and I can't believe how nice this is looking. You can do this too and have good results with a little practice. I can't wait to see it with the final clear coat. Both fenders are now ready for pinstriping. The red on the tank is next. I'll take all 3 pieces to the pinstriper and have him use paint that I can use clear over.
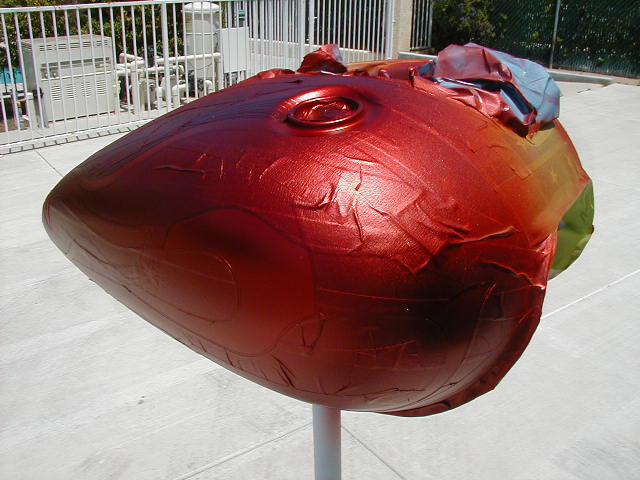
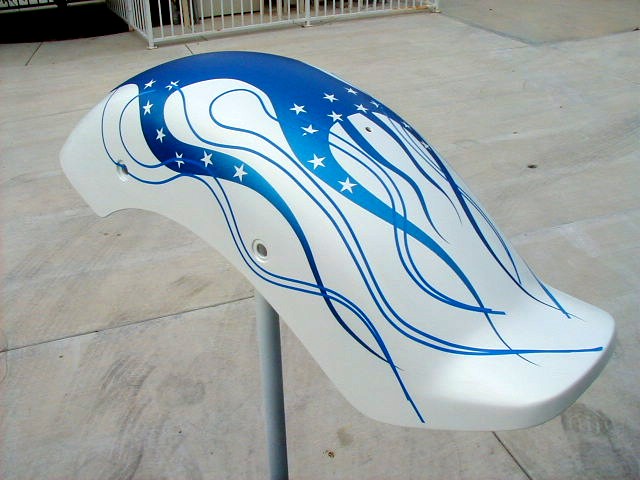
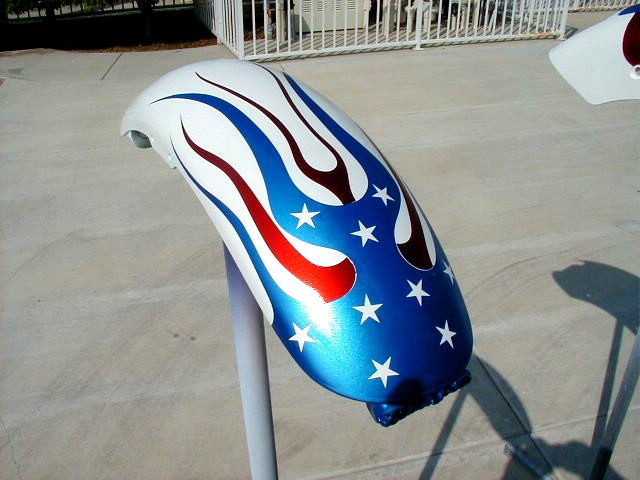
Next, I laid out the design for the Kandy red flames. Using the same process as above, I masked the areas I didn't want painted, degreased the areas, tacked them off, but this time I sprayed 3 coats of silver. I didn't spray directly over the pearl white because there was a possibility that the red would have looked pink. The silver is more neutral, so it really brought out the red in the Kandy. After the silver flashed for about 25 minutes, I sprayed 3 coats of HOK Kandy Red Basecoat, like before, with a 10 minute flash time between coats. I then sprayed two coats of SG-100 over that, then after that flashed for about 15 minutes I pulled all the tape to reveal the results. As you can see all the pieces look nice together. Next is pinstriping and clear.
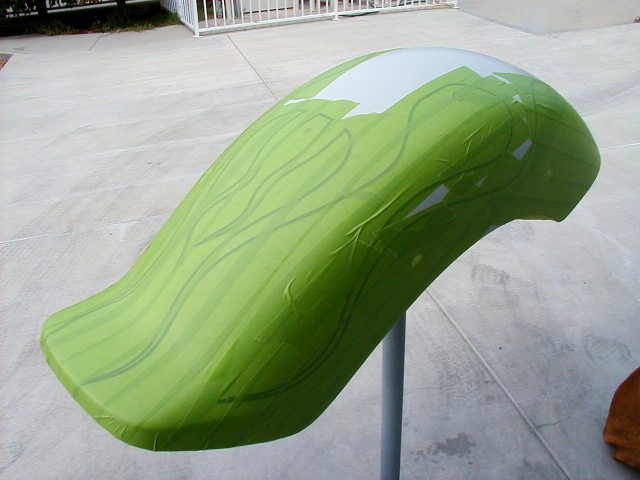
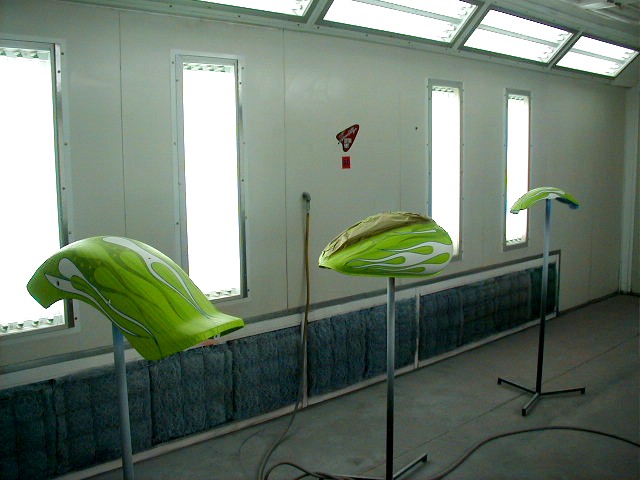
Below are pics of the pinstriping disaster that totally ruined my new paint job. I had to completely sand off the new paint and start over. I was so pissed. I learned a HUGE lesson that when you have to rely on other people to do quality work, GET REFERENCES!!! I cannot stress this enough. The pinstriping had dirt in all the lines and the line were over 1/4" wide. The lines were not smooth but raggidy looking. It looked terrible. I had to sand off over $500.00 in paint. What a waste! My big mistake was not spraying catalyzed clear over my artwork prior to letting him pinstripe. He said no problem with the SG-100. Ya, right.

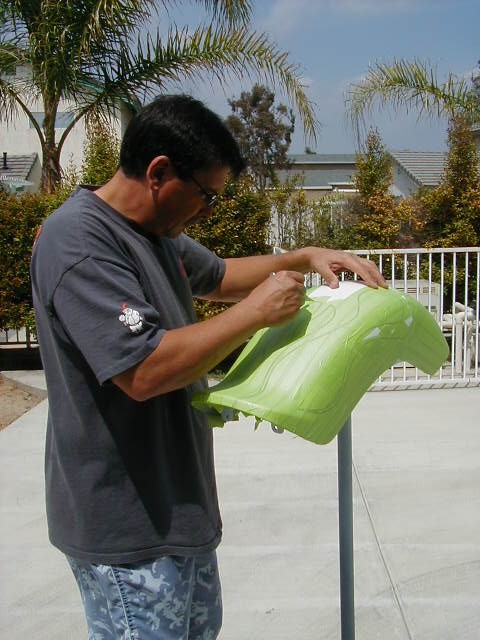
After sanding off my new paint job, I reluctantly started again. I was so discouraged, but plugged away. I decided I was going to work for 5 days straight, 9 hours a day, until it was finished and ready to send to the new pinstriper. I did all the steps that I did above, but sprayed 3 coats of catalyzed urethane clear over all my artwork. After curing over night, I sanded all the pieces with 800 wet, dried 'em off, and took it all down to the pinstriper hoping things would be OK.
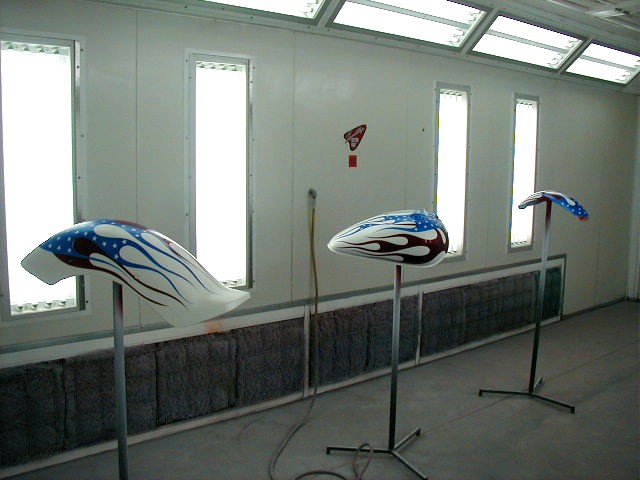
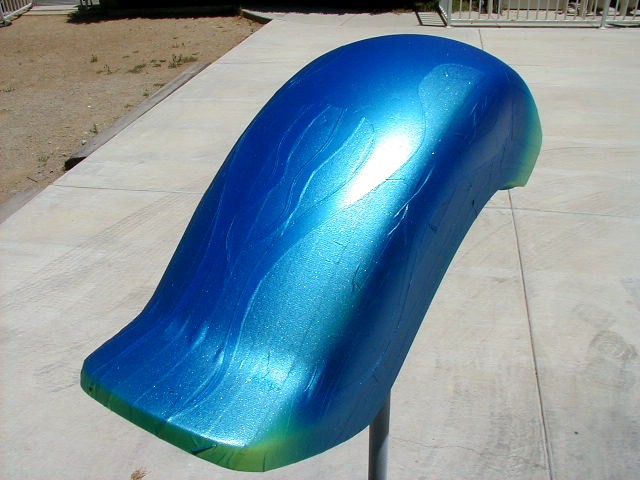
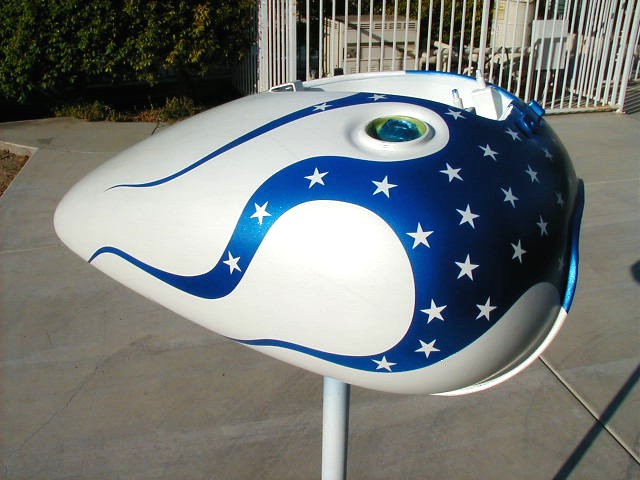
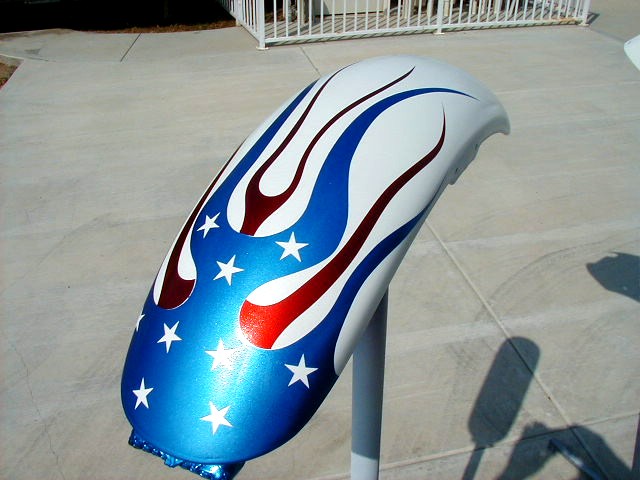
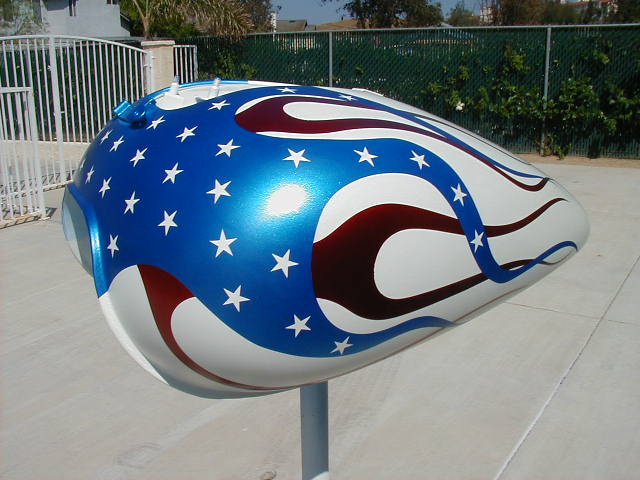
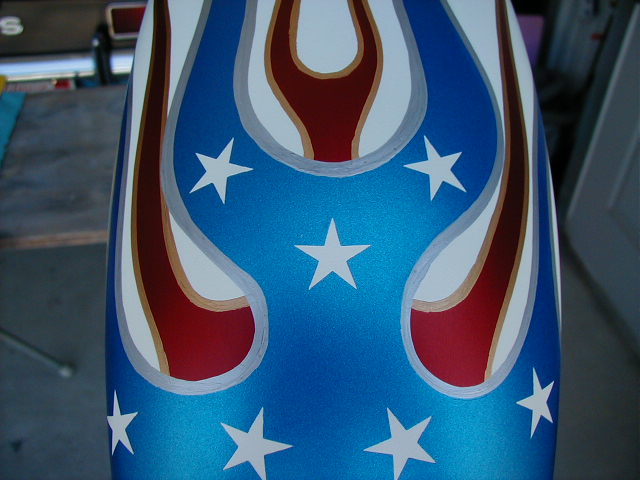
Things were not only OK, they were great! I brought everything to Phil Whetstone, in Santa Ana, CA., to have this stuff done right. We went with gold for the red, but changed to royal blue instead of silver for the blue flames. Phil is an artist! The pinstriping is perfect. He pulled very smooth lines that really accented my paint work. Things are starting to look up.
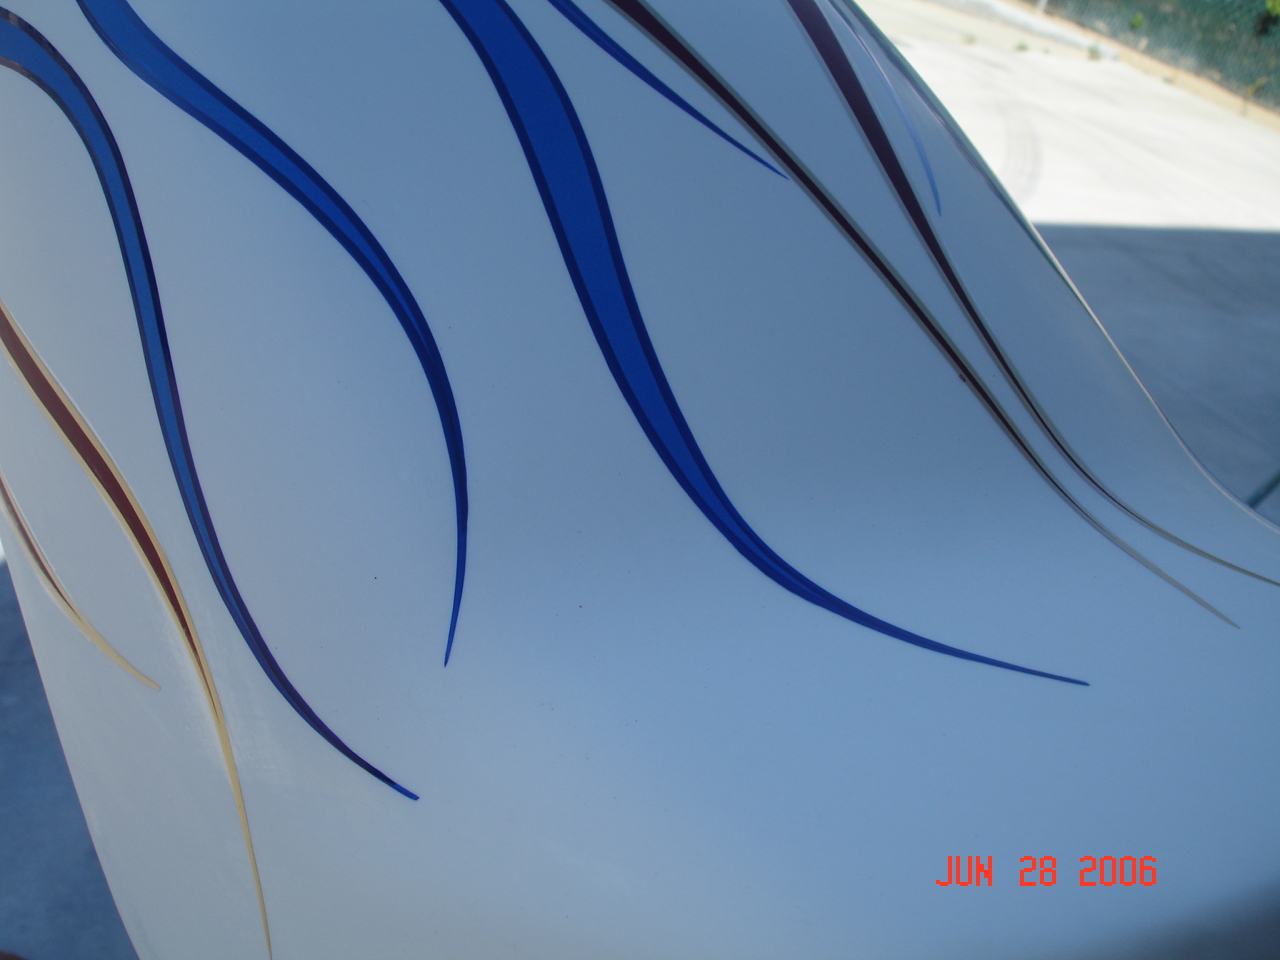


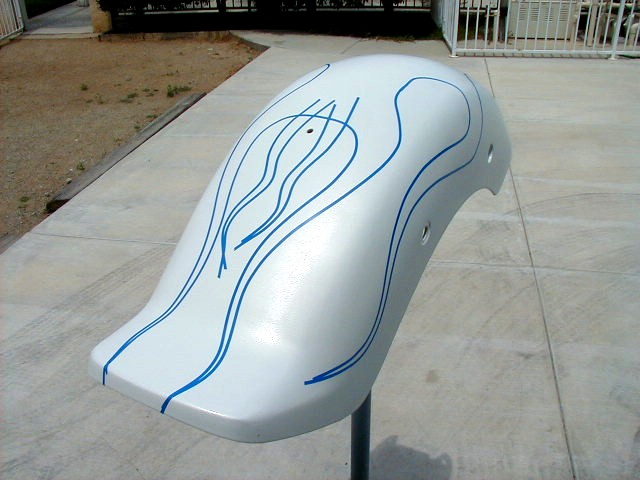
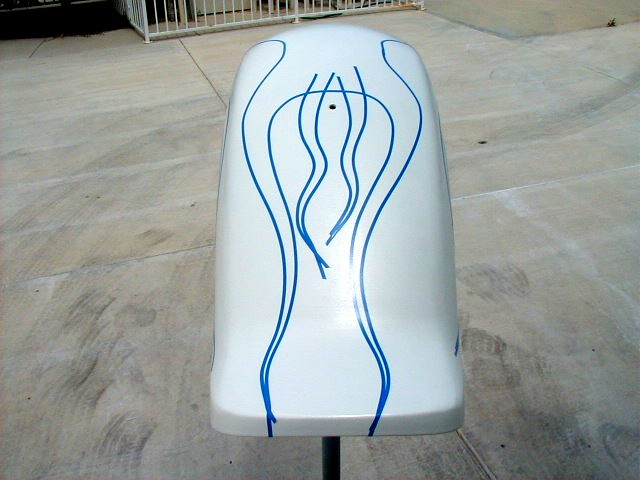
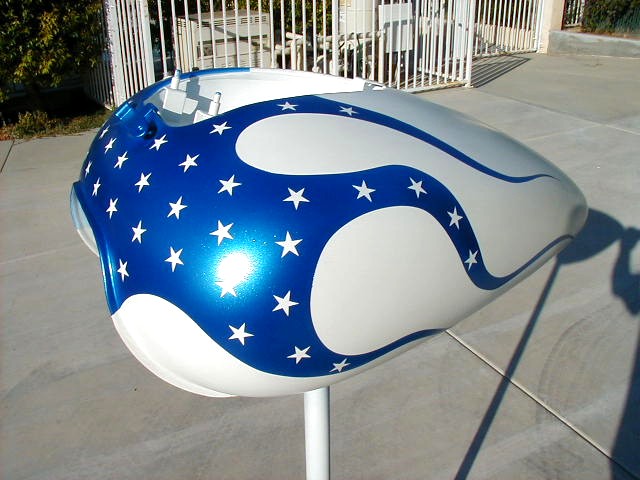
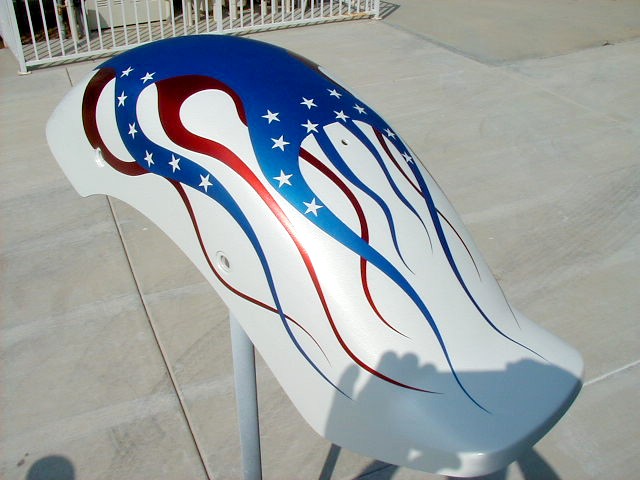
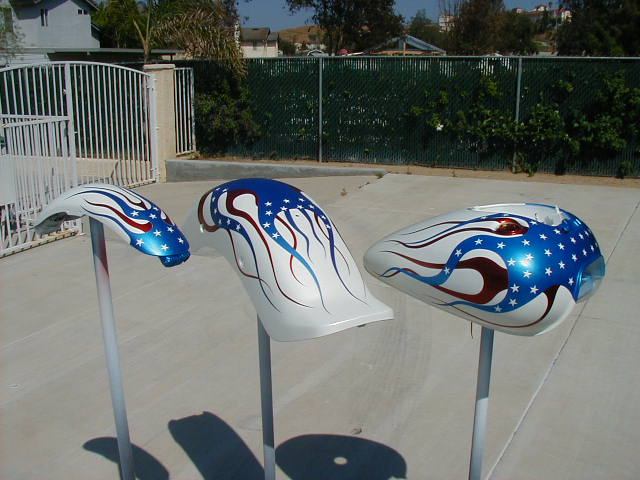
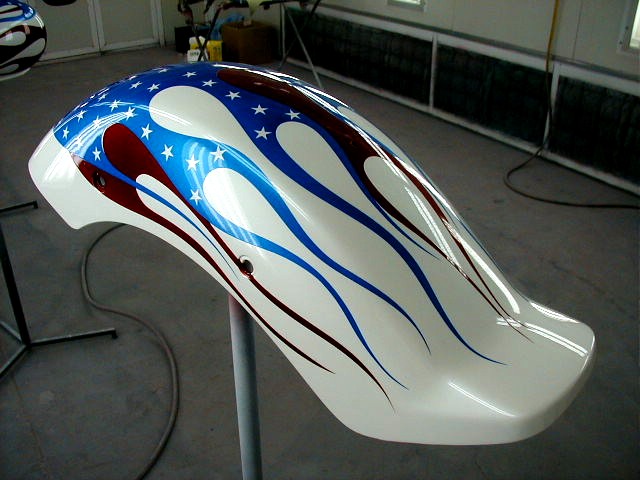
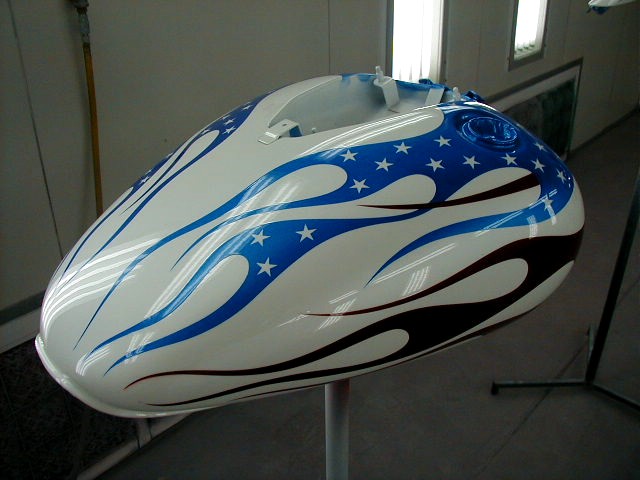
I was still not out of the wood yet, however. I needed to spray 4 coats of urethane clear over the pinstriping. This can be a little tricky because if you spray on too heavy of a coat, your pinstiping can run right off. So the trick is too spray 2 mist or tack coats with a 10 minute flash time in between, then I followed those with 3 medium wet coats and it came out perfect. After curing overnight again, I color sanded and polished the pieces and below is the final result.
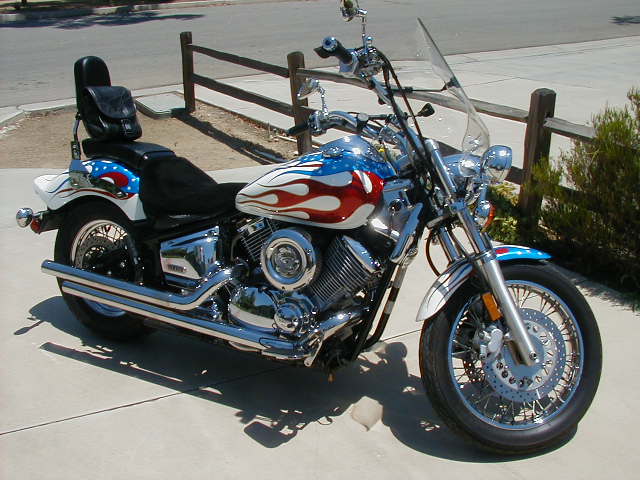
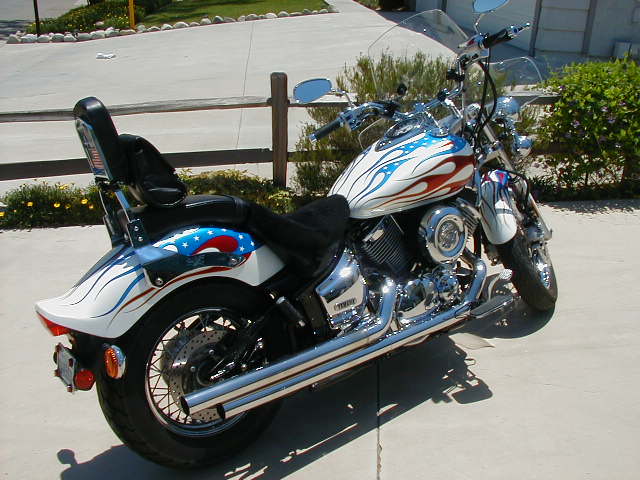
Not too bad for a novice painter.
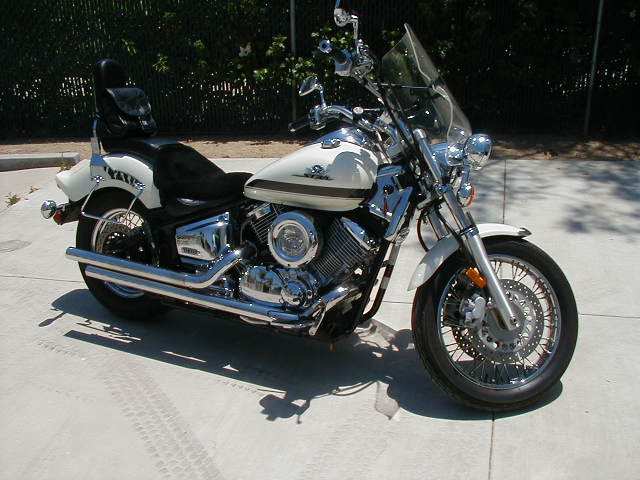
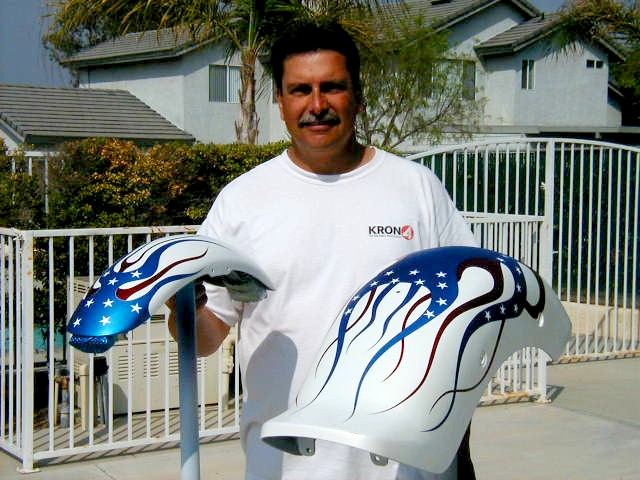
It took about 6 hours to remove the old tins and install the newly painted ones. I'm very happy with the results and my wife is very happy as well.
As you see, painting can be a rough road with many mistakes that can cost a lot of money. Hopefully, you have learned from some of my mistakes and will take the chance to do some of your own paintwork. It's very rewarding to see what you can create. Next is my Harley where I'm going to do some marblizing over a pearl black base with Kandy Blue over that, and some flames on top of all that.
Good luck and email me with any questions you have.
Site Last Updated 7/4/2006